2023 CQ Challenge
Read the Rules
Print out the rules and read them through thoroughly at least twice to make sure you have a clear idea of what is expected and when. Before you send in your submission, re-read the rules and cross check that you have included everything with your submission. Omitting something will cause a delay at best and a rejection at worst.
The shape and size of your quilt
Size: minimum 50x50cm, maximum 100x100cm or anything in between providing there is no dimension less than 50cm or larger than 100cm. Size of 3D pieces to be confirmed.
Check your quilt before binding
Squaring up your quilt and blocking it before you put the binding on (or whatever edge treatment you are using) is good practice.
The "D" sleeve
The instructions below are in centimetres - inches in brackets. If you need to convert them, 2.5cm = 1inch
You have been asked to put a 10cm (4") wide sleeve on the back of your quilt. It should be set 1.25cm (1/2") down from the top edge and 2.5cm (1") in from the sides. It must be able to accommodate a wooden batten. A "D" sleeve is the best and here is how you make one:

Cut a 25cm (10") wide strip of a reasonably firm weave fabric (muslin is not good). The length of strip should be 4cm shorter than the width of the quilt.
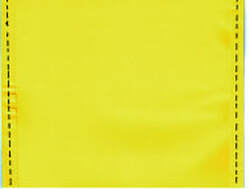
Then iron a 6mm (1/4") fold on both short ends of the strip and stitch it down.
Then iron a 6mm (1/4") fold on both short ends of the strip and stitch it down.

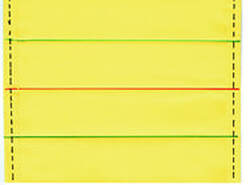
Now fold the strip in half lengthways and iron the fold - the orange line.
Then open it up and fold both long sides into the centre fold and iron - the green lines. You now have three lines marking your strip in quarters
Then open it up and fold both long sides into the centre fold and iron - the green lines. You now have three lines marking your strip in quarters

Now stitch down the quarter folds about 3mm (1/8") from the edge - the black line top and bottom of the photo.
This line of stitching gives your sleeve strength, allows the baton to lie along a straight line and makes it much easier to slip stitch the sleeve onto the quilt.
This line of stitching gives your sleeve strength, allows the baton to lie along a straight line and makes it much easier to slip stitch the sleeve onto the quilt.

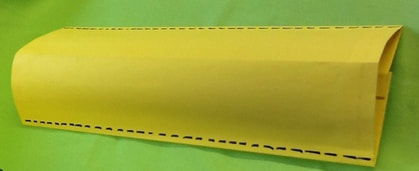
This last seam sits on the back of your quilt. The sleeve should now be 12.5cm (5") at the front and 10cm (4") at the back ie puffing up into a "D" shape.
Now you can stitch your sleeve onto your quilt 1.25cm (1/2") below the top of the quilt. Please sew all the way round the sleeve so that the baton goes onto the sleeve, not behind it.
Now you can stitch your sleeve onto your quilt 1.25cm (1/2") below the top of the quilt. Please sew all the way round the sleeve so that the baton goes onto the sleeve, not behind it.
Sending your quilt
Please make sure your quilt is covered with a waterproof layer, either bubble wrap or plastic, in the event of the quilt being transported in the rain - we live in England and the postmen/delivery men don't care about your quilt.
PLEASE NOTE - We will not be able to return packaging.
Make sure your name and address on the back of the parcel.
Consider using couriers like CollectPlus or MyHermes - they are cheaper than Royal Mail and you can track your quilt until it has been signed for. The whole operation can be done from your computer and then all you do is deliver it at your local agent, usually a newsagent. MyHermes will also pick up from your home.
